API Documentation
Comprehensive reference for the Octopus Home Pro SDK.
API Documentation
The Octopus Home Pro SDK provides comprehensive APIs for accessing various features of the device. This documentation will help you understand and utilize these interfaces effectively.
SDK Overview
IMPORTANT: This method of using the SDK has been deprecated in favor of the home_pro_homeassistant_sdk app available on the Home Pro AppStore. Please go through the app's readme section for information on how to use it. The example applications presented here apply to the app as well.
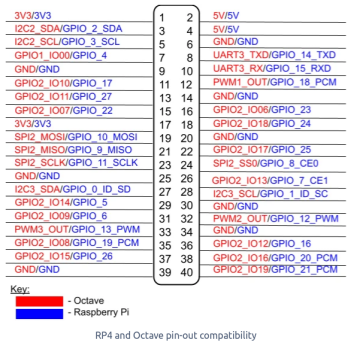
Welcome to the Octopus Home Pro SDK guide. This documentation details the steps and recommendations for developing custom apps on your Home Pro. The Home Pro hosts a 40-pin Raspberry Pi HAT header for connecting Pi-compatible sensors and HATs.
The Home Pro has been released for early review. Eventually users/developers will be able to download apps from the App Store, but for now a custom docker image is automatically downloaded for users to log into, tinker around, and develop apps.
Hardware Interfaces
40-Pin Header Interface
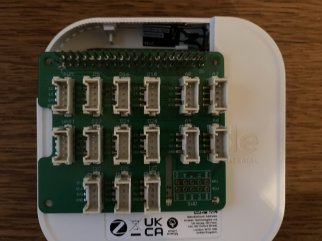
To access the 40-pin header, turn over the Home Pro and remove the small cover at the back.

Here is the pinout of the header and the compatibility with a Raspberry Pi 4 header:
A convenient way to check and test apps is to use a header HAT such as the Grove HAT.
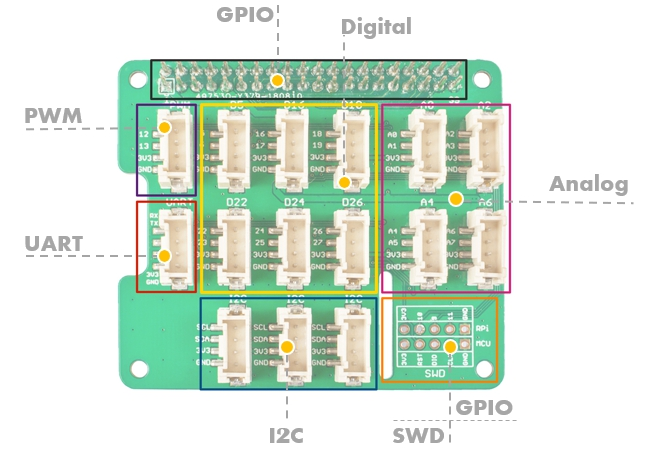
As a best practice, power off your Home Pro before connecting hardware. Place the Grove HAT on the header, ensuring pin 1 of the Home Pro matches pin 1 of the Grove HAT (denoted by a square block of solder while all others are round).
Grove HAT Integration
The Grove HAT provides a convenient interface for connecting various sensors and modules. It's particularly useful for prototype development and testing.
More information about the Grove HAT can be found at:
Grove Base HAT for Raspberry Pi
Sensor Kit Examples
The 37-sensor kit can be used to develop basic apps and prove out connectivity and operation.
This kit is available at: 37 Modules Sensor Kit for Arduino
Although intended for Arduino, the sensors can be connected easily to the Grove HAT for testing with the Home Pro.
API Reference
The Home Pro SDK exposes several APIs that allow you to access different features of the device. These are organized as separate modules in the SDK container:
Energy API (HAN API)
The Home Area Network (HAN) API allows you to interact with smart meter data and energy consumption information. This API provides access to electricity and gas meter data.
The HAN API endpoint is available through the HAN_API_HOST environment variable in the SDK.
Meter Status API
Get the current status of the connected energy meter:
import os
import requests

han_host = os.getenv('HAN_API_HOST')
meter_type = "elec"  # Use "gas" for gas meters

# Call the get_meter_status API
response = requests.post(han_host + "/get_meter_status", json={"meter_type": meter_type})
if response.ok:
    meter_status = response.json()["meter_status"]
    print(f"Meter status for {meter_type} meter: {meter_status}")

    # Extract the ambient consumption indicator
    aconsumindicate = meter_status["status"]["aconsumindicate"]
    if aconsumindicate == 0:
        print("Ambient energy consumption is: Low")
    elif aconsumindicate == 1:
        print("Ambient energy consumption is: Medium")
    else:
        print("Ambient energy consumption is: High")
else:
    print(f"Error calling get_meter_status API: {response.json()['Status']}")
Response Data Fields:
| Variable | Description |
|---|---|
| type | Indicates meter type (gas/elec) |
| mstatus | Meter status (bitmap indicating various states) |
| aconsumindicate | Ambient consumption level (0=Low, 1=Medium, 2=High) |
| lastupdated | UNIX timestamp when the IHD received the data |
For electricity meters, the mstatus bitmap represents:
| Bit | Purpose | Description |
|---|---|---|
| Bit 7 | Reserved | For future use |
| Bit 6 | Service Disconnect Open | Set when service has been disconnected |
| Bit 5 | Leak Detect | Set when a leak is detected |
| Bit 4 | Power Quality | Power event like low/high voltage detected |
| Bit 3 | Power Failure | Power outage detected |
| Bit 2 | Tamper Detect | Set when a tamper event is detected |
| Bit 1 | Low Battery | Battery needs maintenance |
| Bit 0 | Check Meter | Errors in measurement, memory, or self-check |
Meter Consumption API
Retrieve current and historical energy usage data:
import os
import requests

han_host = os.getenv('HAN_API_HOST')
meter_type = "elec"

# Call the get_meter_consumption API
response = requests.post(han_host + "/get_meter_consumption", json={"meter_type": meter_type})
if response.ok:
    meter_consumption = response.json()["meter_consump"]
    consumption = meter_consumption["consum"]

    # Convert to human-readable values
    total_kwh = consumption["consumption"] / 1000  # Convert Wh to kWh
    instant_kw = consumption["instdmand"] / 1000   # Convert W to kW

    print(f"Current total consumption is {total_kwh:.3f}kWh and the instant demand is {instant_kw:.3f}kW")
else:
    print(f"Error calling get_meter_consumption API: {response.json()['Status']}")
Response Data Fields:
| Variable | Description |
|---|---|
| consumption | Current total consumption in Wh with scaling applied |
| instdmand | Current demand in W with scaling applied |
| unit | Unit of measure used for the raw data |
| lastupdated | UNIX timestamp when the IHD received the data |
| rawcons | Raw total consumption before multiplier/divisor applied |
| multiplier | 24-bit ASCII Hex number for scaling values |
| divisor | 24-bit ASCII Hex number for scaling values |
| rawinstdmand | Raw instant demand before scaling |
Example Energy Monitor
Here's an example application that monitors energy consumption and flashes an LED when consumption increases:
import os
import requests
import time
from Octave_GPIO import Octave_GPIO

# Setup GPIO for LED
gpio = Octave_GPIO()
gpio.setup(6, gpio.OUT)  # Using pin 6 for LED

# Configure HAN API
han_host = os.getenv('HAN_API_HOST')
meter_type = "elec"

last_consumption = 0

while True:
    # Get consumption data
    response = requests.post(han_host + "/get_meter_consumption", json={"meter_type": meter_type})

    if response.ok:
        print("Calling API: get_meter_consumption")
        meter_consumption = response.json()["meter_consump"]
        consumption = meter_consumption["consum"]

        total_kwh = consumption["consumption"] / 1000  # Convert to kWh
        instant_kw = consumption["instdmand"] / 1000   # Convert to kW

        print(f"Current total consumption is {total_kwh:.3f}kWh and the instant demand is {instant_kw:.3f}kW")

        # Check if consumption has increased
        if consumption["consumption"] > last_consumption:
            # Flash the LED
            gpio.output(6, 1)  # LED on
            print("LED blinked!")
            time.sleep(0.5)
            gpio.output(6, 0)  # LED off

        last_consumption = consumption["consumption"]

    # Get meter status
    status_response = requests.post(han_host + "/get_meter_status", json={"meter_type": meter_type})
    if status_response.ok:
        print("Calling API: get_meter_status")
        meter_status = status_response.json()["meter_status"]
        aconsumindicate = meter_status["status"]["aconsumindicate"]

        if aconsumindicate == 0:
            print("Ambient energy consumption is: Low")
        elif aconsumindicate == 1:
            print("Ambient energy consumption is: Medium")
        else:
            print("Ambient energy consumption is: High")

    time.sleep(5)  # Wait for 5 seconds before the next check
Screen API
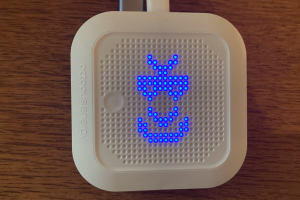
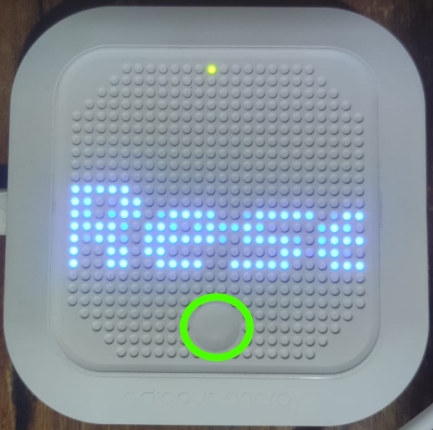
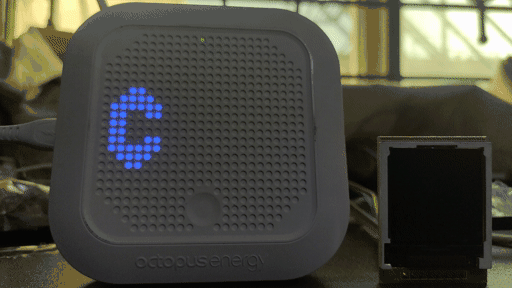
The Home Pro features a 24×12 LED matrix display on the front. Each app gets its own dedicated screen/card that users can cycle through using the touch button.
The Screen API endpoint is available through the SCREEN_API_HOST environment variable in the SDK.
Authentication
The Screen API requires authentication:
import os
import requests

# Basic authentication setup
headers = {
    "Authorization": f"Basic {os.environ['AUTH_TOKEN']}"
}

# Get basic info from environment
host = os.getenv('SCREEN_API_HOST')
app_name = os.getenv('APPLICATION_NAME')
base_url = f"{host}/api/v1/screen"
Getting Screen Information
First, retrieve your application's screen ID:
import os
import requests

# Create the base header
headers = {
    "Authorization": f"Basic {os.environ['AUTH_TOKEN']}"
}

# Get basic info from environment
host = os.getenv('SCREEN_API_HOST')
app_name = os.getenv('APPLICATION_NAME')
base_url = f"{host}/api/v1/screen"

# Get screen info
screen_info_url = f"{base_url}/application/{app_name}"
rsp = requests.get(screen_info_url, headers=headers)
if not rsp.ok:
    print("Failed to get screen info for application")
    exit(1)

# Get our screen id from the response
first_screen = rsp.json()[0]
screen_id = first_screen['_id']
print(f"Screen ID: {screen_id}")
Updating the Screen Content
Once you have the screen ID, you can update the content displayed on your application's screen:
import os
import requests

# Create the base header
headers = {
    "Authorization": f"Basic {os.environ['AUTH_TOKEN']}"
}

# Get basic info from environment
host = os.getenv('SCREEN_API_HOST')
app_name = os.getenv('APPLICATION_NAME')
base_url = f"{host}/api/v1/screen"

# Get screen info
screen_info_url = f"{base_url}/application/{app_name}"
rsp = requests.get(screen_info_url, headers=headers)
if not rsp.ok:
    print("Failed to get screen info for application")
    exit(1)

# Get our screen id from the response
first_screen = rsp.json()[0]
screen_id = first_screen['_id']

# Build up the request json for a scrolling message
message = "Hello from SDK!"
payload = {
    "value": f"{message}",
    "animationType": "scroll",
    "type": "text",
    "brightness": 200,
    "animationInterval": 100
}

# Update the screen
screen_update_url = f"{base_url}/{screen_id}"
rsp = requests.patch(screen_update_url, headers=headers, json=payload)
if not rsp.ok:
    print("Failed updating screen for application")
else:
    print(f"Successfully updated screen with message: {message}")
Available Animation Types:
- scroll: Scrolling text
- static: Static text or pattern
Display Options:
- brightness: Value from 0-255
- animationInterval: Speed of animation in milliseconds (lower is faster)
- type: "text" or "bitmap"
GPIO API
The GPIO API allows you to control the General Purpose Input/Output pins on the 40-pin header.
Basic GPIO Control
from Octave_GPIO import Octave_GPIO
import time

# Initialize GPIO
gpio = Octave_GPIO()

# Configure a pin as output
pin = 5  # GPIO pin 5
gpio.setup(pin, gpio.OUT)

# Blink the LED
try:
    while True:
        gpio.output(pin, 1)  # Set high - LED on
        print("LED on")
        time.sleep(1)
        gpio.output(pin, 0)  # Set low - LED off
        print("LED off")
        time.sleep(1)
except KeyboardInterrupt:
    # Clean up on exit
    gpio.cleanup()
    print("GPIO cleaned up")
The example above makes an LED blink every second:
I2C API
The I2C API allows you to communicate with I2C devices connected to the 40-pin header. There are two I2C buses available.
Detecting I2C Devices
from Octave_I2C import Octave_I2C
import time

# Initialize the I2C interface
i2c = Octave_I2C()

# Scan for devices on bus 1
print("Scanning I2C bus 1 for devices...")
devices = i2c.scan_bus(1)
print(f"Found {len(devices)} devices")

for address in devices:
    print(f"Device found at address: 0x{address:02X}")
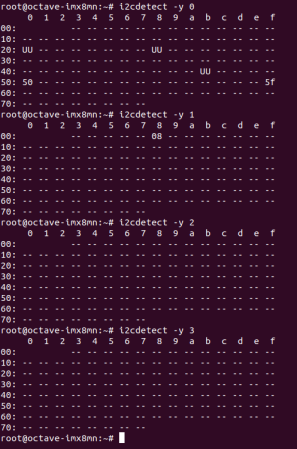
The i2c-detect utility shows available I2C devices:
Example: Reading from MPU6050 Accelerometer/Gyroscope
The following example communicates with the GY-521 module (MPU6050 sensor):
from Octave_I2C import Octave_I2C
import time

# MPU6050 constants
MPU6050_ADDR = 0x68
ACCEL_XOUT_H = 0x3B
GYRO_XOUT_H = 0x43
PWR_MGMT_1 = 0x6B

# Initialize I2C
i2c = Octave_I2C()
bus = 1  # Using I2C bus 1

# Wake up the MPU6050
i2c.write_byte_data(bus, MPU6050_ADDR, PWR_MGMT_1, 0)

def read_word(reg):
    # Read high and low bytes and combine them
    high = i2c.read_byte_data(bus, MPU6050_ADDR, reg)
    low = i2c.read_byte_data(bus, MPU6050_ADDR, reg + 1)
    value = (high << 8) + low
    # Convert to signed value
    if value >= 0x8000:
        return -((65535 - value) + 1)
    else:
        return value

try:
    while True:
        # Read accelerometer data
        accel_x = read_word(ACCEL_XOUT_H)
        accel_y = read_word(ACCEL_XOUT_H + 2)
        accel_z = read_word(ACCEL_XOUT_H + 4)

        # Read gyroscope data
        gyro_x = read_word(GYRO_XOUT_H)
        gyro_y = read_word(GYRO_XOUT_H + 2)
        gyro_z = read_word(GYRO_XOUT_H + 4)

        # Convert to usable values
        accel_x_g = accel_x / 16384.0  # Convert to g (1g = 9.8 m/s^2)
        accel_y_g = accel_y / 16384.0
        accel_z_g = accel_z / 16384.0

        gyro_x_deg = gyro_x / 131.0  # Convert to degrees per second
        gyro_y_deg = gyro_y / 131.0
        gyro_z_deg = gyro_z / 131.0

        # Print values
        print(f"Accelerometer: X={accel_x_g:.2f}g, Y={accel_y_g:.2f}g, Z={accel_z_g:.2f}g")
        print(f"Gyroscope: X={gyro_x_deg:.2f}°/s, Y={gyro_y_deg:.2f}°/s, Z={gyro_z_deg:.2f}°/s")
        print("-------------------")

        time.sleep(0.5)
except KeyboardInterrupt:
    print("Measurement stopped by user")
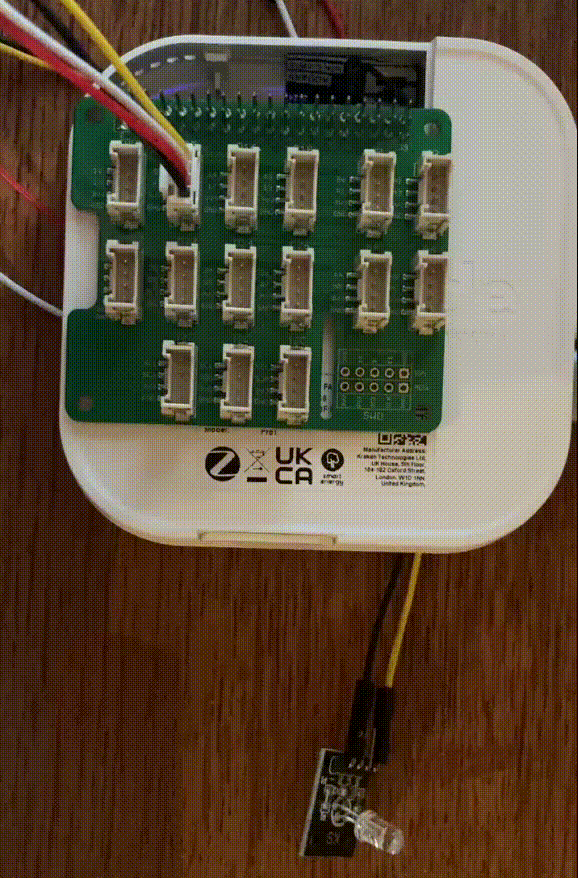
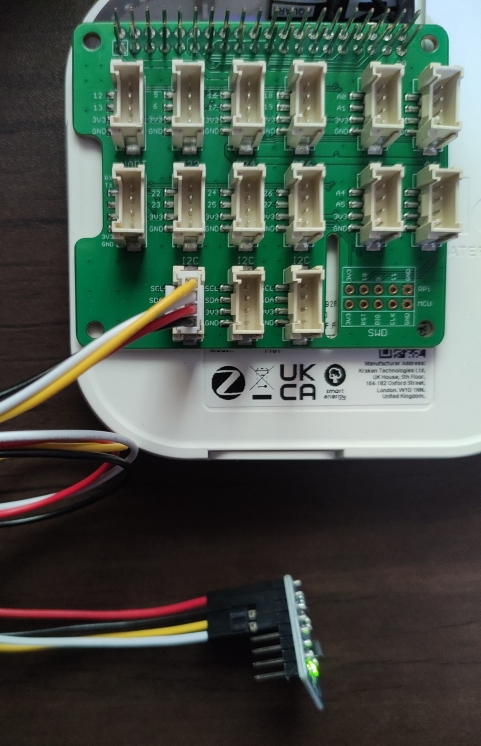
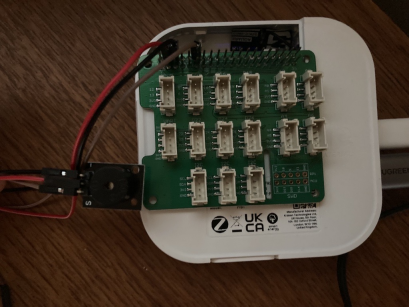
Connect the MPU6050 module as shown:
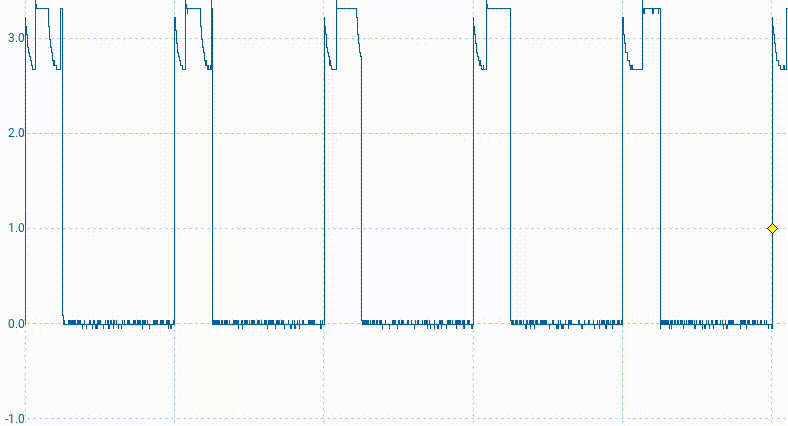
The I2C communication can be visualized on a picoscope:

PWM API
The PWM API allows you to control the Pulse Width Modulation outputs on the 40-pin header.
Example: Generating Audio with a Passive Buzzer
from Octave_PWM import Octave_PWM
import time

# Initialize PWM
pwm = Octave_PWM()
pin = 12  # PWM pin 12

# Configure PWM frequency
pwm.start(pin, 0)  # Start with 0% duty cycle

try:
    # Play a simple ascending tone
    for freq in range(250, 1000, 50):
        print(f"Frequency: {freq}Hz")
        pwm.change_frequency(pin, freq)
        pwm.change_duty_cycle(pin, 50)  # 50% duty cycle
        time.sleep(0.3)

    # Small pause
    pwm.change_duty_cycle(pin, 0)
    time.sleep(0.5)

    # Play a simple melody
    notes = {
        'C': 262,
        'D': 294,
        'E': 330,
        'F': 349,
        'G': 392,
        'A': 440,
        'B': 494
    }

    melody = ['C', 'C', 'G', 'G', 'A', 'A', 'G']

    for note in melody:
        freq = notes[note]
        print(f"Playing note {note} ({freq}Hz)")
        pwm.change_frequency(pin, freq)
        pwm.change_duty_cycle(pin, 50)
        time.sleep(0.3)
        pwm.change_duty_cycle(pin, 0)
        time.sleep(0.1)

except KeyboardInterrupt:
    # Clean up on exit
    pwm.stop(pin)
    print("PWM cleaned up")
Connect the passive buzzer as shown (using 5V power from pin 4 and ground from pin 6):
The PWM signal can be visualized on a picoscope:
SPI API
The SPI API allows you to interface with SPI devices like displays and sensors.
Example: Scrolling Text on an SPI TFT LCD
This example uses a ST7735-based TFT LCD screen:
from Octave_SPI import Octave_SPI
import time

# Initialize SPI with appropriate pins
spi = Octave_SPI()
dc_pin = 11   # A0/DC pin
rst_pin = 13  # RST pin
cs_pin = 24   # CS pin
bl_pin = 15   # Backlight pin

# Configure display
spi.configure_display(dc_pin, rst_pin, cs_pin, bl_pin)

# Clear display
spi.clear_display()

# Set backlight
spi.set_backlight(True)

# Set text properties
spi.set_text_color(0xFFFF)  # White
spi.set_text_size(1)

# Create scrolling text
message = "Hello from Octopus Home Pro!"
x_pos = spi.width()  # Start from right edge

try:
    while True:
        # Clear display for each frame
        spi.clear_display()

        # Update text position
        x_pos -= 3
        if x_pos < -len(message) * 6:  # 6 pixels per character
            x_pos = spi.width()

        # Draw text at current position
        spi.draw_text(x_pos, spi.height() // 2 - 4, message)

        # Display frame
        spi.update_display()

        # Small delay for animation
        time.sleep(0.05)
except KeyboardInterrupt:
    # Clean up on exit
    spi.clear_display()
    spi.set_backlight(False)
    print("SPI display cleaned up")
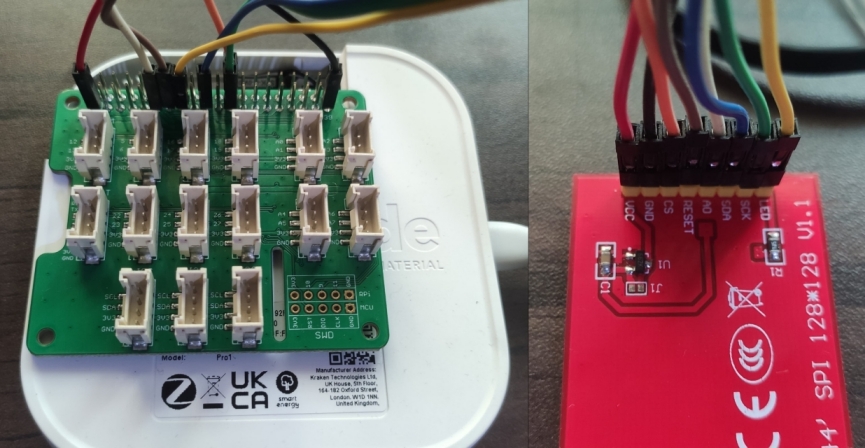
Connect the TFT display according to this pin mapping:
| TFT Label | Pi Header Pin |
|---|---|
| LED / BL | 15 |
| SCK | 23 |
| SDA | 19 |
| A0 (DC) | 11 |
| RST | 13 |
| CS | 24 |
| GND | 39 |
| VCC | 1 |
Data Storage API
The Home Pro provides persistent storage for your applications in the /data directory. This allows your app to store settings, logs, and other data that needs to persist across reboots.
Example: Configuration Management
import os
import json

# Configuration paths
DATA_DIR = "/data"
CONFIG_FILE = os.path.join(DATA_DIR, "config.json")

# Example configuration
default_config = {
    "alert_threshold": 3000,  # Watts
    "check_interval": 60,     # Seconds
    "notifications_enabled": True
}

# Save configuration
def save_config(config):
    os.makedirs(DATA_DIR, exist_ok=True)
    with open(CONFIG_FILE, 'w') as f:
        json.dump(config, f, indent=2)
    print(f"Configuration saved to {CONFIG_FILE}")

# Load configuration
def load_config():
    if os.path.exists(CONFIG_FILE):
        with open(CONFIG_FILE, 'r') as f:
            return json.load(f)
    else:
        # No existing config, save and return defaults
        save_config(default_config)
        return default_config

# Example usage
config = load_config()
print(f"Loaded configuration: {config}")

# Update a setting
config["alert_threshold"] = 4000
save_config(config)
Reset Functionality
The Home Pro provides several reset options for different purposes:
SDK Reset
If you encounter issues with your SDK container or application, you can perform an SDK reset:
- Scroll to the reset screen using the round touch button on the bottom front of your Home Pro.
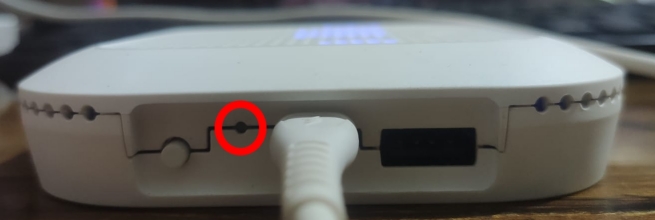
- Locate the pin hole reset button between the USB ports and the white WPS button.
- Press and hold the reset button. The screen will cycle through different options.
- When the screen displays "SDK Reset", release the reset button.
- Within 30 seconds, click the reset button once to confirm the reset.
Note: SDK reset will not delete data stored in the /data directory, which allows applications to preserve their settings.
Factory Reset
For more serious issues, you can perform a factory reset:
- Follow the same procedure as for SDK Reset, but continue holding the reset button.
- When "Factory Reset" appears on the screen, release the button.
- Within 30 seconds, click the reset button once to confirm the reset.
Warning: A factory reset will erase ALL data including the SDK container, all applications, and all stored data. Your device will return to its original state.
Troubleshooting
Common API Issues
Connection Refused Errors
If you receive "Connection Refused" errors when calling APIs:
requests.exceptions.ConnectionError: HTTPConnectionPool(host='localhost', port=8080):
Max retries exceeded with url: /api/v1/screen (Caused by NewConnectionError(
'<urllib3.connection.HTTPConnection object at 0x7f8a9c1e3d90>:
Failed to establish a new connection: [Errno 111] Connection refused'))
Solutions:
1. Check that the environment variable for the API host is correctly set and accessible
2. Verify that the service is running (systemctl status [service-name])
3. Check for network configuration issues
4. Verify that your application has the required permissions
Authentication Failures
For API calls that require authentication:
{"error":"Authentication required","status":401}
Solutions:
1. Verify that the AUTH_TOKEN environment variable is correctly set
2. Check that the authentication header is properly formatted
3. If using the SDK container, ensure it hasn't been restarted (which can invalidate tokens)
HAN API Not Returning Data
If the HAN API doesn't return expected meter data:
Solutions:
1. Check physical connectivity to smart meters
2. Verify meter type ("elec" or "gas") is correctly specified
3. Ensure smart meters are in normal operating mode
4. Try moving the Home Pro closer to your smart meters to improve signal
GPIO Permission Issues
If you get permission errors when accessing GPIO:
RuntimeError: Not running with sufficient privileges to access GPIO
Solutions:
1. Ensure your application is running with the correct user permissions
2. Check that the GPIO service is running
3. Verify that pins are correctly specified and not already in use
Debugging Techniques
Enable Debug Logging
Add detailed logging to your application:
import logging

# Configure logging
logging.basicConfig(
    level=logging.DEBUG,
    format='%(asctime)s - %(name)s - %(levelname)s - %(message)s',
    handlers=[
        logging.FileHandler("/data/app_debug.log"),
        logging.StreamHandler()
    ]
)

logger = logging.getLogger(__name__)

# Use throughout your code
logger.debug("API request params: %s", params)
logger.info("Successfully connected to service")
logger.error("Failed to retrieve data: %s", error)
Checking API Availability
Test if an API endpoint is accessible:
import os
import requests

def check_api_health(api_name, host_env_var):
    """Check if an API endpoint is reachable"""
    host = os.getenv(host_env_var)
    if not host:
        print(f"ERROR: {host_env_var} environment variable not set")
        return False

    try:
        response = requests.get(f"{host}/health", timeout=5)
        if response.ok:
            print(f"{api_name} API is reachable and healthy")
            return True
        else:
            print(f"{api_name} API returned status code: {response.status_code}")
            return False
    except requests.exceptions.RequestException as e:
        print(f"Failed to connect to {api_name} API: {e}")
        return False

# Example usage
check_api_health("Screen", "SCREEN_API_HOST")
check_api_health("HAN", "HAN_API_HOST")
Common Hardware Issues
- Voltage Requirements: Some devices require 5V to function properly. The Grove HAT only supplies 3.3V. For 5V devices, connect directly to the main Home Pro header.
- I2C Connection Issues: Use the i2c-detect.py program to identify connected I2C devices and verify connections.
- LED Matrix Display: If the display isn't updating, make sure you're using the correct screen ID for your application.
- Pin Compatibility: Check the pinout diagram to ensure you're using Raspberry Pi-compatible pin numbers in your code.
Resources and Support
For more detailed help and support, visit the Octopus Developer Community or contact support at developer-support@octopus.energy.
Additional Resources
If you need additional assistance with the Octopus Home Pro APIs, check out these resources:
- API Reference on GitHub - Full API documentation and examples
- Developer Forum - Connect with other developers
- SDK Support - Get help with technical questions
- SDK Changelog - View recent updates and changes
Ready to start developing?
Get the SDK and join our developer community today.